Energy monitor
on Web Server
On the web page below, we post short Tutorials to explain the configuration and functionalities of the MEMo3B web server in a condensed manner. You can either go through the tutorials from beginning to end or select the desired video. These tutorials are regularly added to and updated.
You can download the full MEMo3B manual here:
The MEMo3B manual describes the functionalities of the Web server. The Quickstart datasheet accompanying each product provides info on module configuration in the various web servers , as well as the configuration in the MEMo3B web server.
IP address
Every MEMo3B web server that comes out of the package is set by default to DHCP for the LAN port while the WiFi (WLAN) is set to OFF. So, as soon as you start up the MEMo3 and connect it to LAN, it will be assigned an IP address, and you will find this address on the MEMo3 web server’s display.
Type this IP address followed by port number (e.g., 192.168.0.85:8080) into the toolbar of your web browser and you will be taken to the home page of the web server.
Note: Also with the IP server scanner tool (windows application) you can find and modify this IP address and also link it to WiFi but more on that later in this tutorial.
Configuration page MEMo3B
At configuration/settings, the general settings can be adjusted.
In the first section, one can change the default password ( master, 2020) for access outside the network via port-forwarding by entering 2x the new password and login, setting the language version and then pressing “SEND PASS”.

The second paragraph shows both the WIFI and LAN IP addresses. One can change these addresses manually or one can set them as DHCP so that the router will set them itself. Confirm each change via the “SEND IP” button after which MEMo3 restarts. WiFi activation can only be done through the IP server scanner or through the REDIRECT method.
At the third, fourth , fifth and sixth sections, one can enter the parameters for MQTT, http upload, email and NTP clock setting respectively.
By the 7th paragraph, you can FIRST download the firmware of the linked modules and if that works download and install the firmware of the MEMo3.
At paragraph 8 you can start entering the indicative energy prices.
In the video below, we briefly go over the above paragraphs:
WiFi configuration MEMo3B
There are 2 methods to connect your MEMo3B to your WiFi network, namely the REDIRECT method and the IP Server Scanner method.
REDIRECT: This requires putting the MEMO3B into WiFi access mode. Briefly press the reset button to reboot the Memo, then continue to press the “MENU” button until the toolbar on the Memo display ends and WiFi connect appears on the display. Connect with your PC to the Memo access point ( password adminMEMO) and in the “REDIRECT Page” enter your wifi settings.
Here we bring MEMo3 into access mode already:
IP SERVERSCANNER: Run the server scanner within the network in which your Memo is connected via LAN. Select the Memo and press button ‘SET IP’ and select your web server . Enter SSID, WiFi password and select DHCP. After ‘SAVE, the Memo will reboot and you can read the IP address on the display.
In the video below, we briefly go over both methods:
Setting MEMo3 to DHCP
De MEMo3 module heeft zowel een WiFi als een LAN verbinding en beide kunnen elk op een totaal ander netwerk staan. Bij elke nieuwe MEMo3 staat default de WiFi uitgeschakeld en LAN staat ingesteld op DHCP wat zoveel betekent dat wanneer je de MEMo3 de eerste maal opstart en koppelt met een LAN netwerk, deze een vrij en vast IP adres toegekend krijgt van de router en dit IP adres kan je dan aflezen op het MEMo3 display en vervolgens invoeren in je webbrowser.
In onderstaande video wordt getoond hoe je zelf een MEMo3 in deze DHCP mode kan brengen zodat je deze makkelijk in een nieuw netwerk kan pluggen en deze automatisch een vast IP adres krijgt.
Werkwijze: Eénmaal op de server, in de setup pagina de LAN op DHCP aanvinken, op send IP drukken en dan nog eens op send IP drukken, en dan net voor het opnieuw rebooten, snel LAN loskoppelen als deze nog inzat.
Als je nu een volgende keer de server gaat opstarten met de LAN gekoppeld op je nieuwe netwerk krijgt deze een fix IP adres van je router.
Dan je PC koppelen met ditzelfde netwerk en het nieuwe IP adres(display) van MEMo3 invoeren.
Configuring REL.44 module
The REL.44 module is connected via bus ( GND, A, B ) (preferably EIB bus cable: black (GND), yellow(A), white(B)) to the MEMo3. Power for this module comes either from the P1 port of the digital meter, or from a 9-15VDC power supply on the top + connector only, or from the + (red) conductor of the MEMo3 module.
In the configuration,‘REL.44‘ always applies as the module type and the mode is set through the channel’s function:
- either bi-stable for the 4 relay contacts
- or P1 for the different P1 meters
- either counter for the 2 pulse inputs
- or time for the 2 pulse inputs
Important, all created energy channels of this module are given the same Modbus address. In the video below we go over the different ‘modes’ :
Upgrade, Erase MEMo3 via the display
Once the Web server is connected to STABLE Internet via LAN or WiFi, we can upgrade the MEMo3 from the menu on the display. You get into the menu by pressing the right button (upgrade) until the running bar ends. Once in the menu, short press the upgrade button and long press again until the bar ends to upgrade CSS/JAVA, or the MEMo FIRMWARE, or“ERASE” to clear the web server (excluding IP addresses).
In the video below, we briefly show how to do it:
Standard EMM.220-630,… via Modbus
The configuration of a Modbus energy meter of type EMM.120, EMM.120CT, EMM220, EMM,630, EMM,630CT, … is the same in each case.
So:
- Type: EMM.220-630
- Mode: Energy
On the display of the energy meter you enter a unique Modbus address for each meter, and this Modbus address we then also enter into the web server so that both can communicate with each other. Also note here that Modbus energy meters are also set to 9600.8N1 each time. Coupling via LoRa is explained further in this manual.
- The subaddress 0 for phase 1 (voltage , current, power,…)and for import(total-consumption) across the 3 phases,
- The subaddress 1 for phase 2 (voltage , current, power,…)and for export(total injection ) across the 3 phases,
- The subaddress 2 for phase 3 (voltage , current, power,…)
Standard EMM.220-630,… via LoRa
MEMo3 heeft de mogelijkheid om met behulp van een RG gateway( RG.016) module, een EMM.220-630 draadloos via LoRa te koppelen aan de centrale MEMo3 webserver.
De configuratie van de EMM220-630 is praktisch dezelfde zoals bij koppeling via Modbus, alleen moet je hier ook het serienummer van het tussenstation ( RF gateway module) toevoegen aan de configuratie. En ook hier krijgt de EMM.220-630 een uniek Modbus adres. In onderstaande video tonen we hoe het moet:
Dus:
- Type: EMM.220-630
- Mode: Energy
- Extra : serienummer 08Gxxxx1
JOIN:
Eerst je configuratie van de EMM.220-630 saven. De eerste maal moet ook de RG.016 “ge-joined” worden met de MEMo3: De RG.016 moet vervolgens onder spanning gebracht worden zodat er 2 leds op de module snel knipperen. De module staat nu in de JOIN modus ( 60 sec.) Binnen de minuut moet men nu op ‘JOIN’ drukken en vervolgens op ‘SEND’. Indien geslaagd zal er een melding verschijnen COMMUNICATION OK’. Desnoods deze handeling herhalen. Het kan wel een paar minuten duren voor de eerste meetwaarden verschijnen.
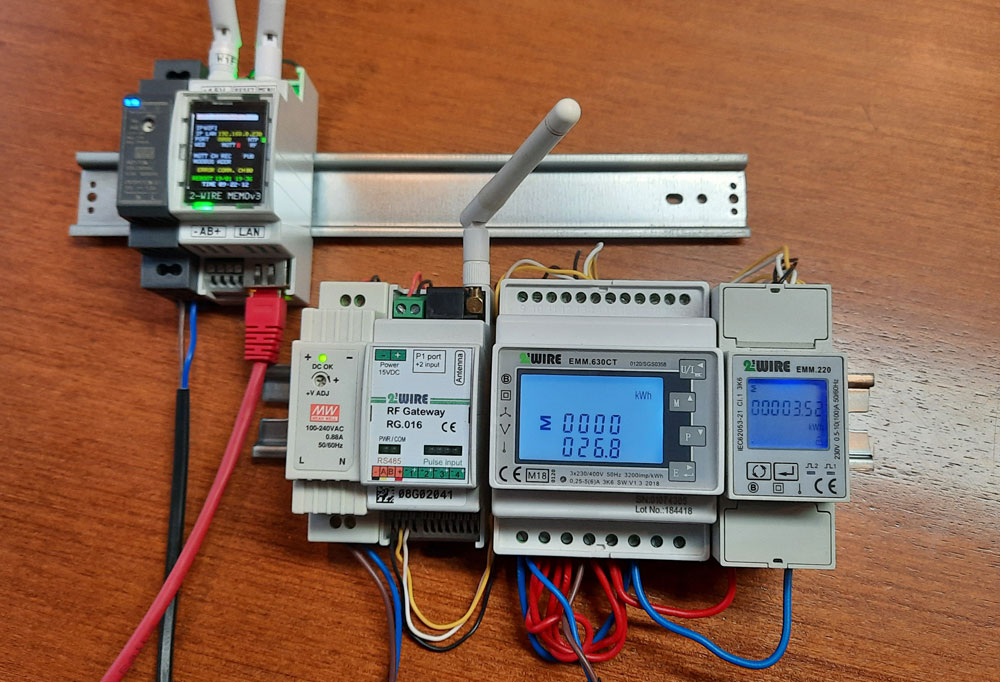
Linking the RG.016 (RF gateway) module via LoRa
De RG.016 module kan men ofwel bekabeld via Modbus, ofwel draadloos via LoRa koppelen met de MEMo3 webserver. Er kunnen meerdere RG.016 modules gelijktijdig op de 2 methoden gekoppeld zitten aan dezelfde MEMo. Naast het doorgeven van Modbus waarden van energiemeters ( EMM.220-630 zie vorig hoofdstuk) heeft de RG.016 zelf ook 8 energiemeters welke elk in een energiekanaal kunnen gelogd worden, nl.:
- De P1 poort: 1. import H+L, 2.export H+L, 3.Gas, 4. combi export/export/H/L
- 4 binair-analoge ingangen elk apart in te stellen als:
- pulsteller
- tijdmeter
- temperatuur meter (NTC)
Belangrijk: Anders als bij de REL.44 module MOETEN hier elk van deze 8 kanalen een uniek Modbus adres krijgen.
Belangrijk: JOIN: Als je module nog niet gekoppeld zit: eerst je configuratie van je energiekanaal saven. De RG.016 moet vervolgens onder spanning gebracht worden zodat er 2 leds op de module snel knipperen. De module staat nu in de JOIN modus ( 60 sec.) Binnen de minuut moet men nu op ‘JOIN’ drukken en vervolgens op ‘SEND’. Indien geslaagd zal er een melding verschijnen COMMUNICATION OK’. Desnoods deze handeling herhalen. Het kan wel een paar minuten duren voor de eerste meetwaarden verschijnen.
In onderstaande video tonen hoe het moet ingeval LoRa, de koppeling via Modbus is identiek enkel het ‘joinen’ is daar NIET nodig.