Energy monitor
on Web Server
Link LoWi with WiFi
Connect once with WiFi and from then on LoWi is accessible from any device with a web browser in your network
On the web page below, we post tutorials to explain the configuration and functionalities of the LoWi3 web server. You can download the extensive manual and abbreviated QS (QuickStart) manual here
Be sure to check out the FAQ/LoWi page, recurring questions get answers there.
1. Collect network settings
Before starting to link the LoWi server to your local WiFi network, you need the WiFi password but also a number of IP addresses in the range of your own WiFi network, namely:
- a fixed and free IP address for LoWi3
- IP address subnet mask
- IP Address Gateway
- Port number
To determine the correct addresses you can go to the network settings of your PC and copy them there, or you can use the Windows IP server scanner tool which you can download from our website.
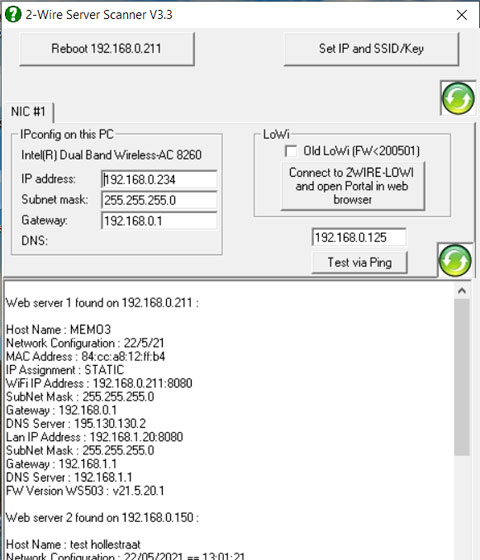
IP server scanner
Once installed you can start server scanner via the shortcut on your PC worksheet. The tool shows the IP address, subnet mask and gateway of your PC at the top left.
Subnet mask (e.g. 255.255.255.0) and gateway (e.g. 192.168.0.1) can be adopted, in the IP address of your PC (e.g. 192.168.0.234) you change the fourth digit by a number between 2 and 254 and this number (e.g. 192.168.0.125) you enter above the ‘test via ping’ button.
With the ‘test via ping’ button you can test if this IP address is still free and if not adjust the fourth number and test again, until you have a free IP address.
For the port number, choose a number between 8000 and 9000, e.g. 8111. For the DNS address, you can take 8.8.8.8.
In this way, all the necessary addresses are collected to enter them into your LoWi3 web server via the ‘REDIRECT ‘ page.
This server scanner tool can also be used to find the IP address of all already configured web servers in your network (LoWi, ReMI, MiLo, MEMo). The ‘Set IP’ button only works for MEMo, MEGA and ELAN web server the ‘Reboot’ button also works for all 2-WIRE web servers and will reboot selected module.
On the video to the right you can see the summary for a moment:
2. Connect LoWi to your WiFi network.
The next step is now to temporarily put LoWi3 in “WiFi access point mode”, to then connect your PC to this ‘LoWi wifi network’ and so through the REDIRECT page enter the collected IP addresses and WiFi password into LoWi3 so that LoWi is linked into your network.
The procedure is as follows: Connect the LoWi server to the P1 port of the digital meter. Once your LoWi is booted up and you see a one blue LED light up occasionally, then continue to press the LoWi switch for about 4-6 seconds until the blue LED stays on continuously. LoWi is now temporarily a WiFi access point.
Note: If your LoWi module is already connected to your WiFi network and you still want to change these WiFi network settings: Reconnect LoWi to the P1 port and then keep pressing the LoWi switch within 3 seconds and after the first LED flash about 4-6 seconds until the blue LED is on continuously.
REDIRECT PAGE
Now that the blue LED is on continuously, LoWi is a ‘WiFi access point’ and in the list of WiFi networks on the laptop or tablet you will find the ‘2WIRE-LoWi’ network. Select this network. If asked for a password: ‘adminLOWI’.
Automatically after 1-2min a login screen /REDIRECT page will appear in your web browser (or surf from the ‘2WIRE-LOWI’ network itself to 8.8.8.8). On this REDIRECT page we can then choose a WiFi network, start entering WiFi password and the collected IP addresses.
In the video below we have gone through all the steps in full.
TROUBLESHOOT: It is very important during this one-time configuration that both LoWi and the PC and the WiFi router with Internet access are connected,
in each other’s neighborhood
and that there is an
stable WiFi connection
is available. If the digital meter is too far away, I myself occasionally use the P1 adapter cable as this is how I bring LoWi closer to the WiFi router during this process. If it doesn’t work with the PC, try with a laptop or smartphone. If you are not a hero with WiFi networks yourself, ask for help from an acquaintance. If you think you are doing all the actions right and there is something wrong with the module you can alwaysorder an”aftermarket module.
TROUBLESHOOT: If you get the message ” Cannot connect to this network” then possibly your Windows has remembered that you have used this network before. Then go to network and internet settings, WiFi, Manage known networks. Look for 2WIRE LOWI among your wifi networks and click “do not remember.” And now you can try again to connect to access point ‘2wireLOWI’.
Pairing via DHCP: From Firmware version>23.1.23.1, it becomes possible to pair LoWI via DHCP. On this document, we have linked from an IPad in an example:
Configuring LoWi3 via ipad EN
3. LoWi3 functionality.
Basis:
Lowi has 16 log channels and you can populate these with: P1 meters, manually entered meters or MQTT meters. By default, all possible P1 meters are on.
Important: do not use comma’s, no minus signs in front of the fields with numbers because then you risk mutilating the database and have to reset resulting in loss of stored data. You can recognize a mutilated database because‘NaN’ appears in some input fields. In this case, you need to reset the database by entering the number 253 in the GAS and WATER input field in the setup page (see also FAQ LoWi/ReMI/ELAN).
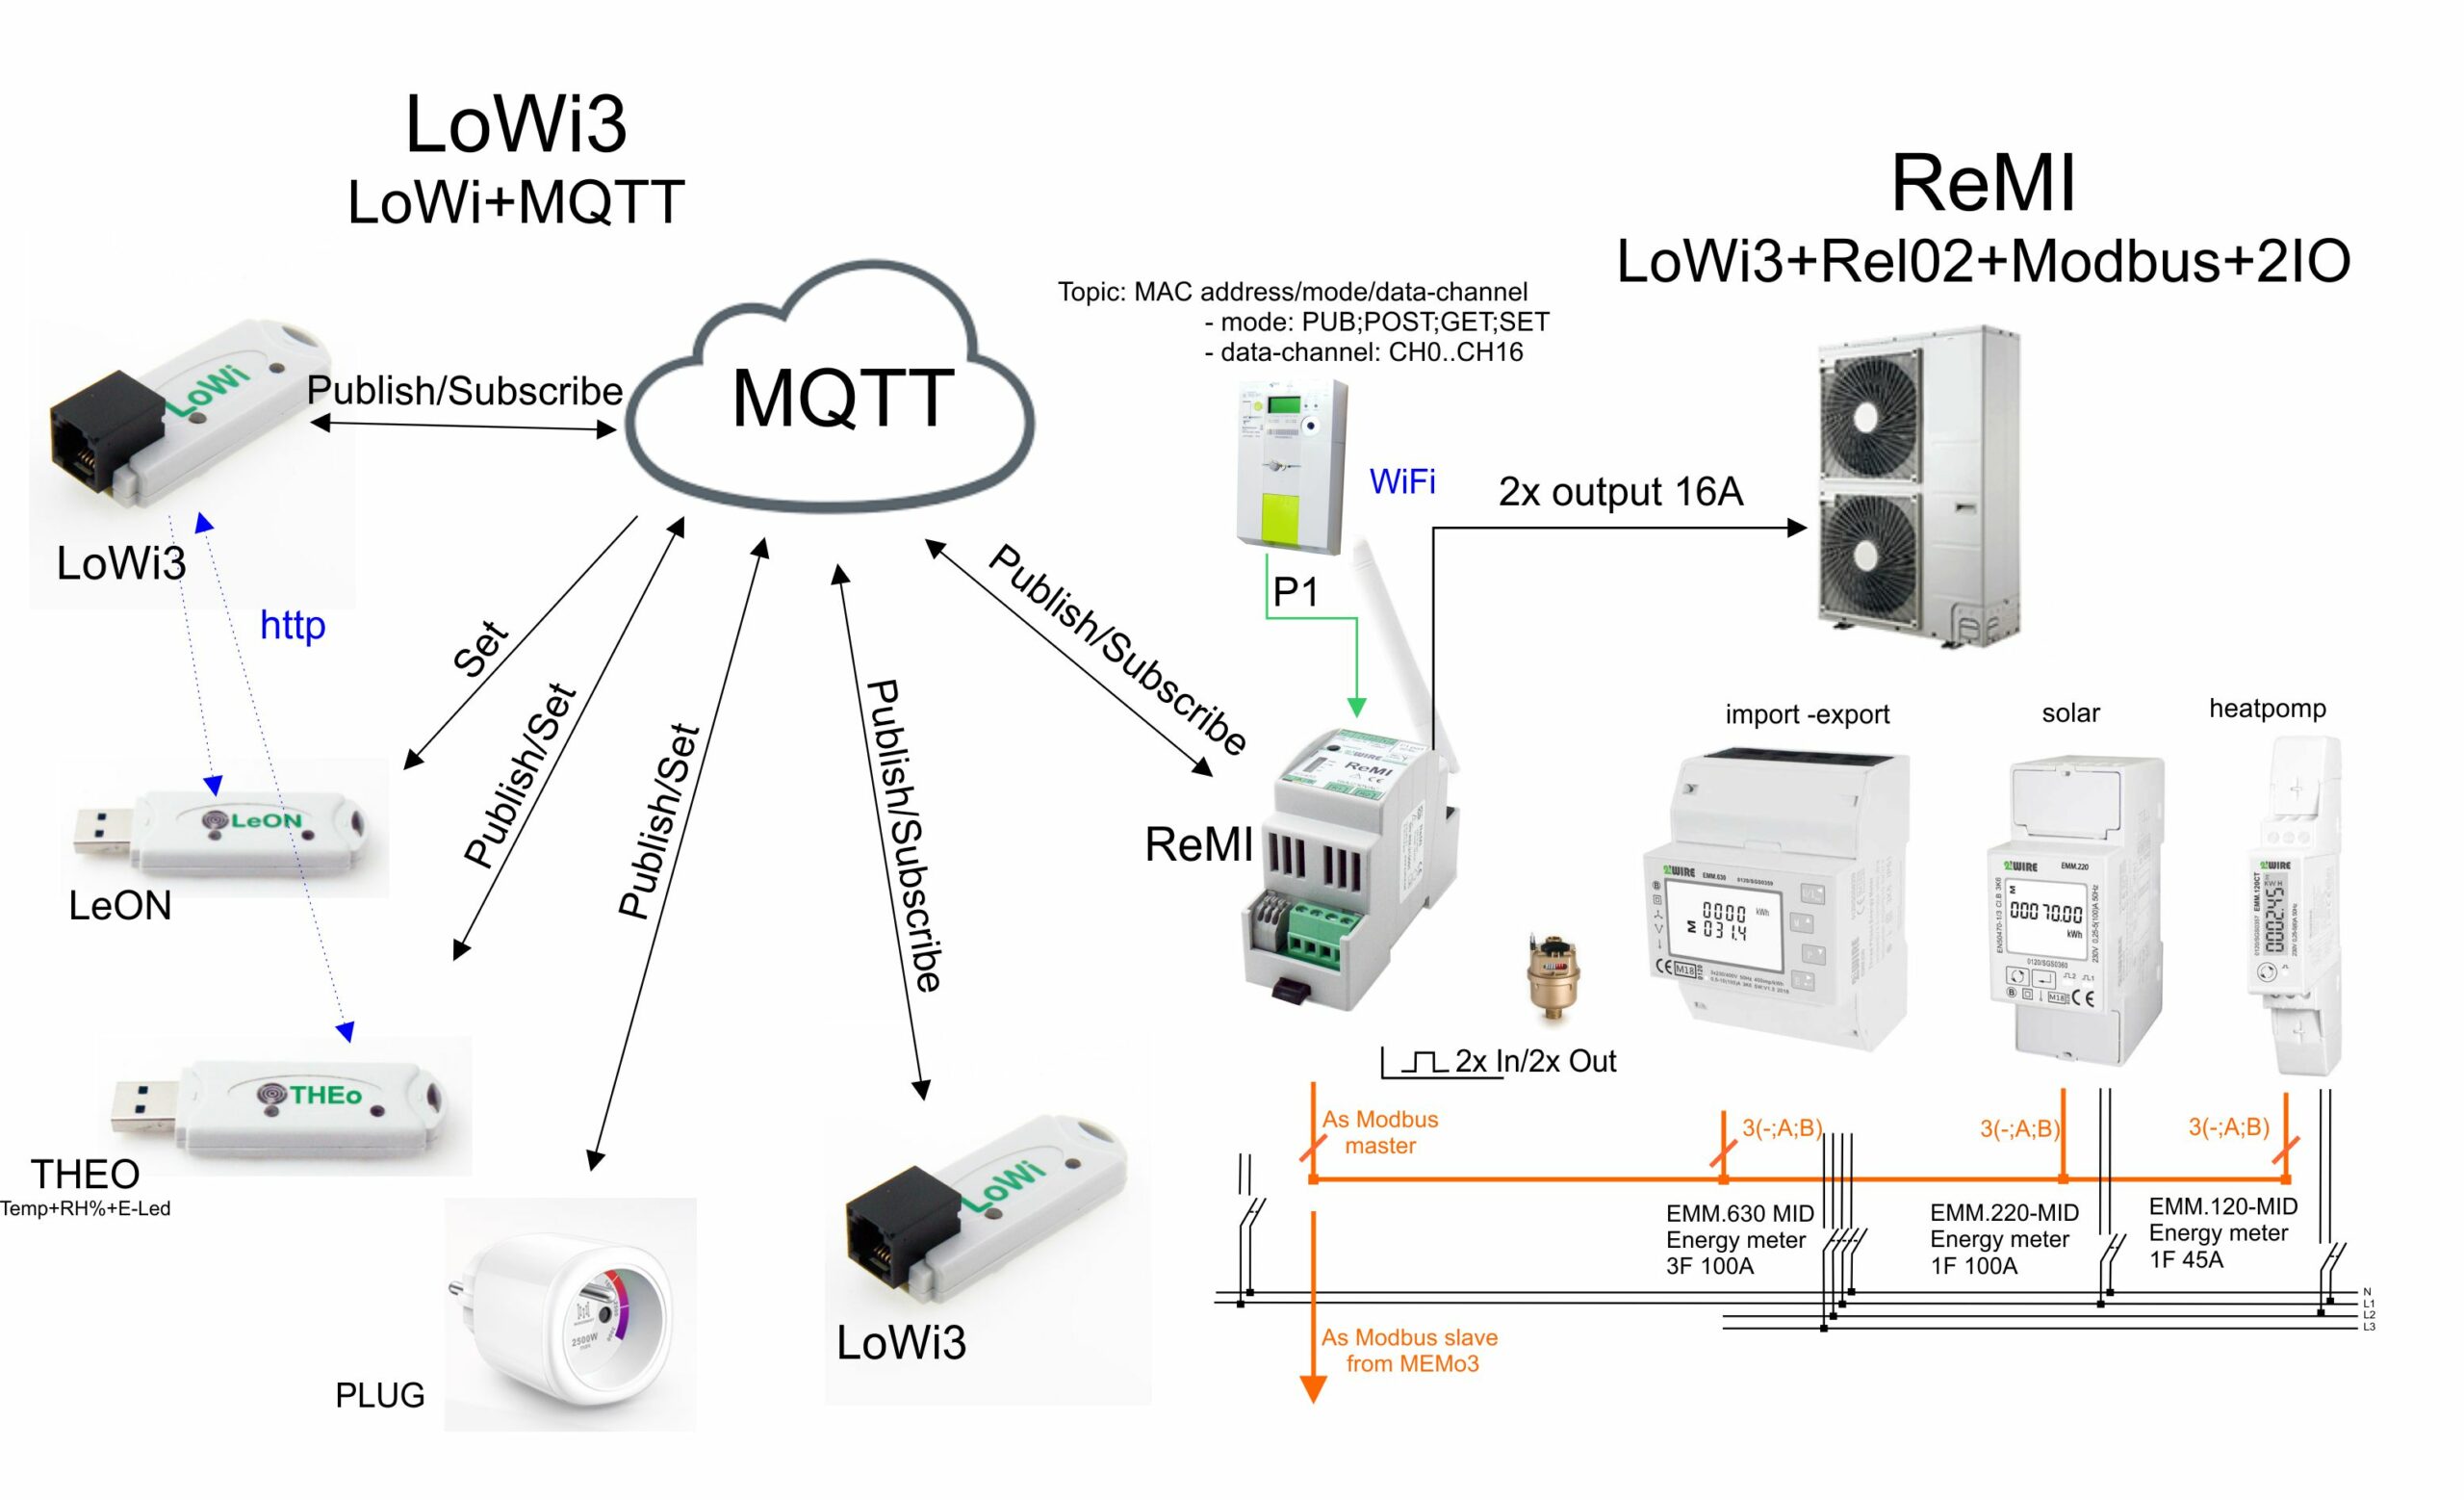
4. MQTT links:
LoWi3 has the capability via MQTT to interconnect several 2-WIRE web servers with their linked meters (LoWi3, ReMI, MEMo3) as well as a number of individual WiFi modules ( LeON, THEo, Plug) over the Internet. The implementation is very simple and the possibilities are enormous. The diagram below provides an overview with a number of links.
To use this additional functionality ‘linking over the internet’ you need a license on an MQTT broker. As a residential user you can subscribe a best to 2-WIRE’s MQTT broker, as an OEM customer you can possibly use your own MQTT broker.
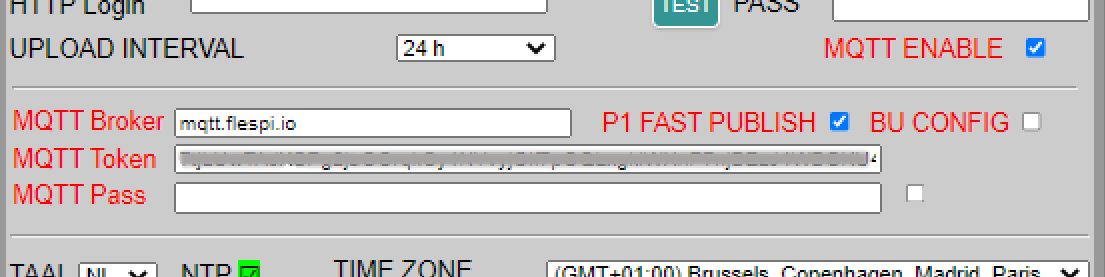
Activate MQTT:
In the LoWi3 setup page, check the option‘MQTT ENABLE” and the input field for MQTT pops open. Here you can enter the MQTT broker URL and the MQTT token of your account.
Or if you have your own MQTT broker (url or IP address without port no) you can also enter a login ( Min. 6 characters) and password instead of a token.
Each 2-WIRE module that you want to connect to this LoWi3 via MQTT will have these same MQTT account settings. With ReMI and MEMo3 you can enter this via the setup webpage, with LeON, THEo and PLUG you can enter this via the Redirect page during the connection to your WiFi network.
Public: Once a module is paired with MQTT, it will automatically upload(publish) all of its log channels to the MQTT broker every minute with every change. For example, a LoWi3 has up to 16 log channels, MEMo3 has up to 64 log channels, THEo has one log channel,… all of which are recharged at every minute.
Check the P1 FAST PUBLISH to publish channel CH0 every 5 seconds, check BU CONFIG to back up your configuration every SAVE. The configuration recall can be done by clicking on the Saturn icon and entering password “adminLOWI”.
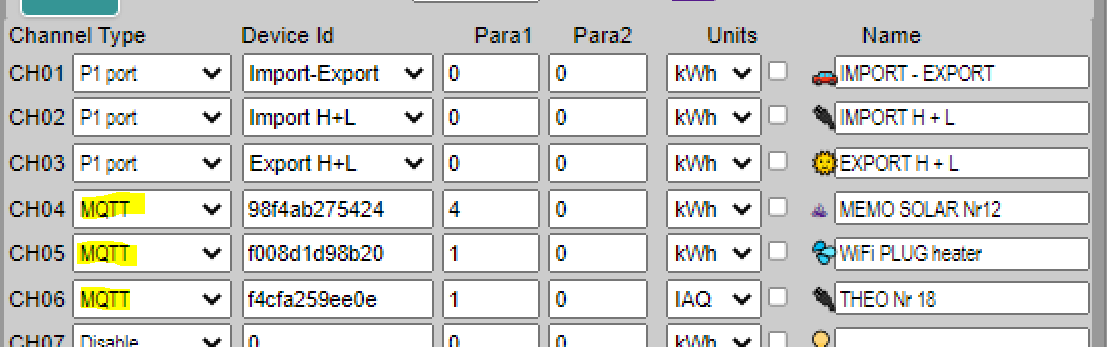
Read MQTT log channels( Subscribe):
To create an MQTT log channel, under ‘channel type’ choose MQTT.
Under ‘Device id’ will be the MAC address of the linked mode, while ‘Para1’ refers to the desired log channel in that module:
- LeON, THEo , PLUG only have one log channel so here you enter number ‘1’. As unit ‘UNIT’ choose ‘IAQ’ for THEo, ‘kWH’ for WiFi PLUG
- LoWi3 , ReMI have up to 16 log channels, MEMo3 has up to 63 log channels so if you want to read data(subscribe) here you enter the desired log channel number along with the correct ‘UNIT’.
At ‘name’ choose a name that is recognizable to you.
In this way you can read data from a module that is installed anywhere in the world.
In the video below we show it briefly or you can also read it in the MQTT manual.
Additional features,
MQTT provides remote access to one or more LoWi3 web servers via the html app “LoRe” (see under PRODUCTS/HTML APP on this website),
and via MQTT the Energy display module can be linked.